 |
 |
Module 7 |
| Caribbean Regional Node | ||
Information | Data
| Software | Sites
| Education | Feedback | News
|
|
Module 7 |
| Caribbean Regional Node | ||
Information | Data
| Software | Sites
| Education | Feedback | News
 Part
1
Part
1
Part2 | Part3 | Part4 | Part5
Introduction to the Bilko for
Windows 2.0
image processing software
Aim of Introduction
To introduce the basic concepts of digital image analysis and to demonstrate a series of operations by which particular features of a digital image may be enhanced.
Objectives
After completing the lessons in this introduction, you should have learned to:
2) select and apply the image analysis and image modification routines of the Bilko for Windows system;
3) call for Help files when in doubt about any image handling procedure.
Contents
Bilko for Windows is an image processing system developed for use with worksheets and lessons in coastal management and oceanographic applications of remote sensing. Its routines may be applied to the analysis of any image in an appropriate format and include many standard image processing functions. It has been designed to run on a Personal Computer (PC), running Microsoft Windows 3.1, Windows 95, Windows NT 4.0 or later. It is optimised to help students learn the techniques of remote sensing. It is assumed that potential users of Bilko for Windows are familiar with the Windows environment and how to use a `mouse'.
Note: This introduction is based on using Bilko with Windows 3.1 but, apart from differences in the way the screen looks with Windows 95 or Windows NT as the operating system, it will work equally well with these later versions of Microsoft Windows.
In this series of introductory lessons you are required to deal with file names and to make entries on the keyboard of your computer. So as to be explicit about how entries should be made the following typographic convention is used throughout the tutorial.
Keynames
In this document the names of keys are written as follows:
<ESC>
for the Escape key, <ENTER> for
the Enter or Return key, <CTRL>
for the Control key, <SPACEBAR>
for the Spacebar, <SHIFT>
for the Shift key, <ALT> for
the Alternate key) and appear in small capital letters. On your own keyboard
the key caps may abbreviate the names or represent them a little differently
.
Direction Keys
The direction keys are the four arrow keys
on your computer's keypad. The name of the individual direction key refers
to the direction the arrow points: the <UP>
key, the <DOWN> key, the <RIGHT>
key, or the
<LEFT> key. Pairs
of keys are sometimes denoted the <VERTICAL>
keys
and the <HORIZONTAL> keys
. You
use the direction keys to move the selection, the pointer, or the insertion
point on your screen.
Combinations of keys and key
sequences
A plus sign (+) between key names to press and hold down
the first key while you press the second key. For example, "press <ALT>+F"
means to press and hold down the <ALT>
key and press the F key, and then release both keys.
A comma (,) between key names means to press and release
the keys one after the other. For example, "press <ALT>,
V" means to press and release the <ALT>
key, and then press and release the V key.
Filenames and directory names
Names of files and directories are typed in all capitals.
For example, if you are asked to perform some operation on a file called
MYVUE.BMP,
what you actually type is shown in capitals: MYVUE.BMP. (In practice it
does not matter whether you type the letters in capitals or not).
Menu Choice
In Bilko for Windows most
entries are made by choosing an item from a menu. The convention adopted
here is that menu items are shown in Arial font bold face type as, for
example, File and Help.
Commonly
used choices have toolbar buttons assigned to them. They can also be invoked
by pressing <ALT> + the underlined
letter in the menu item.
Startup
To begin the introductory guide you must load and run the Bilko for Windows control program (Winbilko.exe). To do this you must have Windows 3.1 or later (e.g. Windows 95 or Windows NT) running.

The Main Bilko for Windows
Menu
You have three options in the menu bar: File, View and Help. We will discuss using Help first as this is particularly useful when you are starting to use Bilko for Windows and are unfamiliar with its capabilities.
Before you do anything else you ought to familiarise yourself with the Help system. Click on Help and the drop-down menu gives you two useful options: Index and Using Help. If you are unfamiliar with the Windows type of Help systems then you should select Using Help and browse through the information provided.
When you select Index and you will see a screen with the following text:
BILKO Help Index
To choose a topic, press Tab to select the underlined topic you want to view, and then press Enter. With the mouse, point to the underlined topic you want to view, and then click the mouse button. Scroll down to see more topics. For more information on using Help, press F1. To return to this topic, choose the Index button.
How to use BILKO
Basic ConceptsDocument Types
Importing and Exporting
Managing Files
Reference
CommandsDefinitions
Dialog Boxes
Keyboard and Mouse
If you move the mouse pointer over topics in the Help
windows which are underlined and normally in green, the pointer
will change from an arrow into a hand. If you now click the left-button
of the mouse you will get information on that topic.
The information in the Bilko for Windows Help screens gives guidance on all aspects of how to use the image processing software. You should consult Help regularly whilst going through this Introduction. The quick key to access help is the F1 function key.
Use of the two buttons to the right of the toolbar
![]()
| 1. IMAGE
Document
2. FILTER Document 3. HISTOGRAM Document 4. PALETTE Document |
5. STRETCH
Document
6. TRANSECT Document 7. FORMULA Document 8. SCATTER Document |
If you are unclear about using Help refer to the box below for basic guidance.

Contents: Whenever you choose this option you will return to the initial list of contents.
Search: Allows you to search for help on a particular topic. When you click on the Search button, a dialog box appears. You can either select a keyword from the list provided or you can type in your search keyword in the top box where the cursor will be. The search will look for the nearest fit if the text you have entered is not found. Once you have selected a keyword from the list or typed in the subject on which you need more information, use the mouse to click on the Show Topics button. In many cases there may only be Help information on one topic for a keyword but in other cases there may be information on several topics relating to one keyword. Click on the topic in which you are interested and then click the Go To button to access the information on that topic.
Back: will return you to the last topic you viewed. If you repeat Back you will eventually return to the Contents page.
History: gives a list of the headings you have investigated with Help and may be used to see what you have covered during the current session.
<< and >>: when activated are the backward and forward browse buttons that move you systematically through a series of related Help topics.
1.2: What does the data in a Stretch document relate to?
1.3: What information do Histogram documents contain and how is this represented?
To make use of the Bilko for Windows software it is necessary to provide an image on which to perform the available operations. Bilko for Windows works with various types of `documents' (files) as was noted above. If you are on a computer network find out where images, palettes, stretches and other documents used by Bilko for Windows are stored in case you need to tell the program software where to find them.
Activity: Click on the File menu: note that the names of the four most recently used filenames are indicated on the menu (see above). Then click on Open. This brings up the File Open dialog box which will initially be looking to list files of the IMAGES document type, since nothing useful can be done until an image is loaded. [Note: make sure the Extract and Apply check boxes are checked (have a 4 or 6 in them, depending on your version of Windows)].
If necessary:
Either use the Drives: and Directories: boxes to tell Bilko for Windows where the images are stored and then click on EIRE4.BMP
Or type the path and filename directly into the
File
Name: box. Then click on ![]() or press <ENTER> to open and
display the image.
or press <ENTER> to open and
display the image.
This will initiate the process of displaying the image file called EIRE4.BMP. If you make a mistake typing in the filename the program will not be able to find the file: it will tell you so, and let you try again. When a suitable image document filename has been entered, a dialog box showing the image size appears (see next page). This dialog box can also be used to alter how it is displayed.
The Extract dialog box
firstly gives the X and Y
coordinates of the First pixel of the
image (top left) and secondly those which define the bottom right boundary
enclosing the image (in the Last: coordinateboxes).
In the case of EIRE4.BMP which is 512 pixels (columns) wide and 256 pixels
(rows) long, the first pixel (top left hand corner) has coordinates (0,
0) and the last image pixel has coordinates (511, 255). The values displayed
initially are the default for that file i.e. its actual size. (They can
be changed if required, but in this case should not be changed.)
Unless the file you are looking at is very large you will normally wish
to display all pixels. In this case Sample
will be set to 1 for both x-axis
(columns) and y-axis (rows), as in the default for EIRE4.BMP. If Sample
is set to 2 for the x-axis (columns), then every other pixel on
each line is displayed. If Sample is set
to 2 for the y-axis (rows) then every other row of pixels will be
displayed. For now, leave the settings as they are and click on ![]() or press <ENTER> to load the
image.
or press <ENTER> to load the
image.
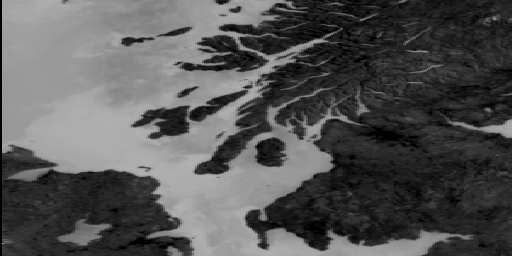
A window with the title EIRE4.BMP which contains the image will now appear in the top left of the UNESCO BILKO workspace.
ii) that the image is rather dark and lacking in contrast with the full range of brightnesses available not being used.
iii) that the menu bar has changed with four new menus (Edit, Image, Stretch and Window) appearing.
Figure 1. Map showing the area covered by the EIREn extracts of NOAA AVHRR images.
![]()
Now move the mouse pointer over the image and click the left hand button. The white arrow places a flashing cursor in the form of a cross (+) on the image where it is clicked. The last four grey panels will now contain the x-coordinate (column), y-coordinate (row) and underlying and display brightness values of the pixel which the cursor is on. If the cursor was on a pixel 90 from the left and 135 rows down the panels would look as follows. [Since no image processing has yet been carried out the underlying data values and display values of the pixels will be the same].
Note: You can move the cursor around the image using the arrow keys on the keyboard. By default (see Edit, GoTo to alter increments), each press of an arrow moves the cursor 10 pixels in the direction indicated until it is within 10 pixels of the edge of the image. To move the cursor one pixel at a time hold down the <CTRL> key and then press the appropriate arrow key. You can also use Edit, GoTo to go to a specific column and row coordinate on the image, e.g. 90, 135.
Question 2: Move the cursor around in a) the sea, b) the large inland lough (=lake) in Northern Ireland (Lough Neagh - see Figure 1), and c) the land areas and make a note of the range of pixel brightnesses for these different parts of the image. Answers
2.1: What are the minimum and maximum pixel brightnesses (DN values) in areas which are clearly sea?
2.2: What are the minimum and maximum pixel brightnesses (DN values) in areas which are clearly lake/lough?
2.3: What are the minimum and maximum pixel brightnesses (DN values) in areas which are clearly land?
When you display several images you can arrange them in the workspace using the Window menu. This is particularly useful when you wish to display four or more images at once but try it out now.

When finished, click the minimize button of the EIRE2 image to park it at the bottom left of the UNESCO BILKO workspace where it should look like the icon to the right (in Windows 3.1).
Question 1
1.1 Top left hand corner of the image at coordinates (0, 0).
1.2 Contrast enhancement of the image data.
1.3 Frequency information relating to image pixel values in the region of the image currently selected. It is represented as a graph of frequencies of each pixel brightness value.
Question 2
2.1 Pixel brightnesses vary between about 100 and 177 in the sea areas.
2.2 Pixel brightnesses vary between 89 and 128 in the large lake (Lough Neagh).
2.3 Pixel brightnesses on land vary between 0 and about
62.
 |
Back to main page | Back to Educational Res. | USDOC | NOAA | NESDIS | CoastWatch |